Plotting (and more generally, analyzing) survey results is a frequent endeavor in many business environments. Let’s not think about arguments whether and when surveys are useful (for some recent criticism see Briggs’ book).
Typically, respondents circle some option ranging from “don’t agree at all” to “completely agree” for each question (or “item”). Typically, four to six boxes are given where one is expected to tick one.
In this tutorial, I will discuss some barplot type visualizations; the presentation is based on ggplot2 (within the R environment) . Sure, much more can be done than will be presented here, but for the scope of this post, we will stick to the plain barplot (although some variations of it).
Let’s load some needed packages:
library(tidyverse)
EDIT: The preparation part of this post has been excluded and moved to an own post, for clarity.
Loading data
So, first, let’s load some data. That’s a data set of a survey on extraversion. Folks were asked a bunch of questions tapping at their “psychometric extraversion”, and some related behavior, that is, behavior supposed to be related such as “number of Facebook friends”, “how often at a party” etc. Note that college students form the sample.
Data are available only (free as in free and free as in beer).
data <- read.csv("https://osf.io/meyhp/?action=download")


data_backup <- data # backup just in case we screw something up
Here’s the DOI of this piece of data: 10.17605/OSF.IO/4KGZH.
OK, we got ‘em; a dataset of dimension 501, 28. Let’s glimpse at the data:
glimpse(data)
## Observations: 501
## Variables: 28
## $ X                  <int> 1, 2, 3, 4, 5, 6, 7, 8, 9, 10, 11, 12, 13, ...
## $ timestamp          <fctr> 11.03.2015 19:17:48, 11.03.2015 19:18:05, ...
## $ code               <fctr> HSC, ERB, ADP, KHB, PTG, ABL, ber, hph, IH...
## $ i01                <int> 3, 2, 3, 3, 4, 3, 4, 3, 4, 4, 3, 3, 4, 4, 3...
## $ i02r               <int> 3, 2, 4, 3, 3, 2, 4, 3, 4, 4, 3, 4, 3, 3, 3...
## $ i03                <int> 3, 1, 1, 2, 1, 1, 1, 2, 1, 2, 1, 1, 1, 4, 1...
## $ i04                <int> 3, 2, 4, 4, 4, 4, 3, 3, 4, 4, 3, 3, 2, 4, 3...
## $ i05                <int> 4, 3, 4, 3, 4, 2, 3, 2, 3, 3, 3, 2, 3, 3, 3...
## $ i06r               <int> 4, 2, 1, 3, 3, 3, 3, 2, 4, 3, 3, 3, 3, 3, 3...
## $ i07                <int> 3, 2, 3, 3, 4, 4, 2, 3, 3, 3, 2, 4, 2, 3, 3...
## $ i08                <int> 2, 3, 2, 3, 2, 3, 3, 2, 3, 3, 3, 2, 3, 3, 4...
## $ i09                <int> 3, 3, 3, 3, 3, 3, 3, 4, 4, 3, 4, 2, 4, 4, 4...
## $ i10                <int> 1, 1, 1, 2, 4, 3, 2, 1, 2, 3, 1, 3, 2, 3, 2...
## $ n_facebook_friends <int> 250, 106, 215, 200, 100, 376, 180, 432, 200...
## $ n_hangover         <int> 1, 0, 0, 15, 0, 1, 1, 2, 5, 0, 1, 2, 20, 2,...
## $ age                <int> 24, 35, 25, 39, 29, 33, 24, 28, 29, 38, 25,...
## $ sex                <fctr> Frau, Frau, Frau, Frau, Frau, Mann, Frau, ...
## $ extra_single_item  <int> 4, 3, 4, 3, 4, 4, 3, 3, 4, 4, 4, 4, 4, 4, 4...
## $ time_conversation  <dbl> 10, 15, 15, 5, 5, 20, 2, 15, 10, 10, 1, 5, ...
## $ presentation       <fctr> nein, nein, nein, nein, nein, ja, ja, ja, ...
## $ n_party            <int> 20, 5, 3, 25, 4, 4, 3, 6, 12, 5, 10, 5, 10,...
## $ clients            <fctr> , , , , , , , , , , , , , , , , , , , , , ...
## $ extra_vignette     <fctr> , , , , , , , , , , , , , , , , , , , , , ...
## $ extra_description  <int> NA, NA, NA, NA, NA, NA, NA, NA, NA, NA, NA,...
## $ prop_na_per_row    <dbl> 0.04347826, 0.04347826, 0.04347826, 0.04347...
## $ extra_mean         <dbl> 2.9, 2.1, 2.6, 2.9, 3.2, 2.8, 2.8, 2.5, 3.2...
## $ extra_median       <dbl> 3.0, 2.0, 3.0, 3.0, 3.5, 3.0, 3.0, 2.5, 3.5...
## $ client_freq        <int> NA, NA, NA, NA, NA, NA, NA, NA, NA, NA, NA,...
Let’s extract only the items, and exclude NAs (there are not many).
data %>%
  select(i01:i10) %>% nrow
## [1] 501
data %>%
  select(i01:i10) %>%
  na.omit %>% nrow
## [1] 493
data %>%
  select(i01:i10) %>%
  na.omit -> data_items
Plotting item distribution
Typical stacked bar plot
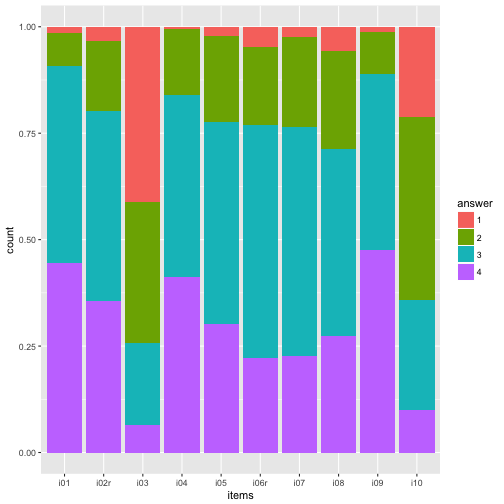
The most obvious thing is to plot the distribution of the items (here: 10) of the survey. So let’s do that with ggplot.
On the x-axis we would like to have each item (i1, i2, …), and on the y-axis the frequency of each answer, in some stapled bar fashion. That means, on the x-axis is one variable only. That’s why we need to “melt” the items to one “long” variable.
data_items %>%
  gather(key = items, value = answer) %>%
  mutate(answer = factor(answer)) %>%
  ggplot(aes(x = items)) +
  geom_bar(aes(fill = answer), position = "fill") -> p1
p1
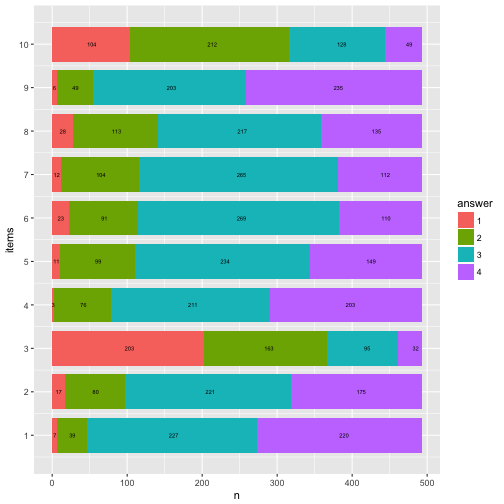
Maybe nicer to turn it 90 degrees:
p1 + coord_flip()
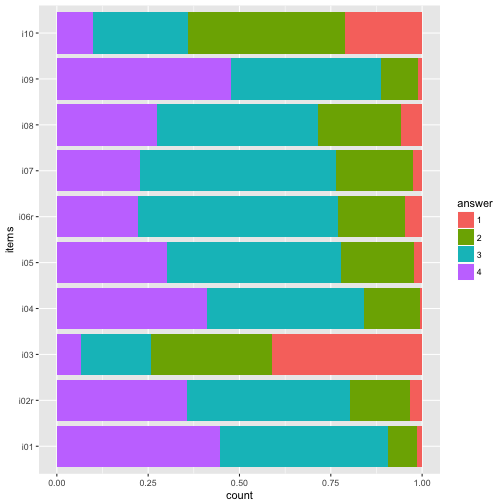
And reverse the order of the items, so that i01 is at the top.
data_items %>%
  gather(key = items, value = answer) %>%
  mutate(answer = factor(answer),
         items = factor(items)) -> data2

ggplot(data2, aes(x = items)) +
  geom_bar(aes(fill = answer), position = "fill") +
  coord_flip() +
  scale_x_discrete(limits = rev(levels(data2$items))) -> p2
p2
Colors
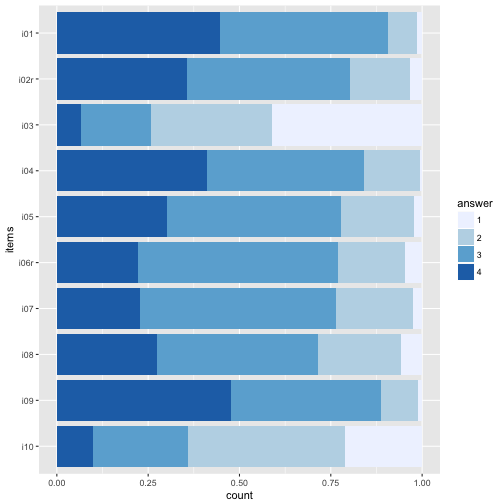
The beauty of the colors lie in the eye of the beholder… Let’s try a different palette.
Sequential color palettes.
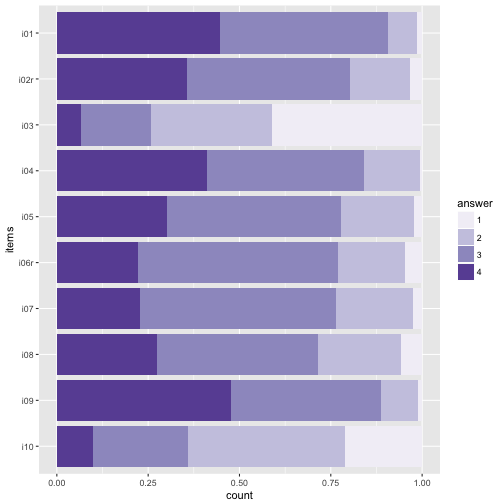
p2 + scale_fill_brewer(palette = "Blues")
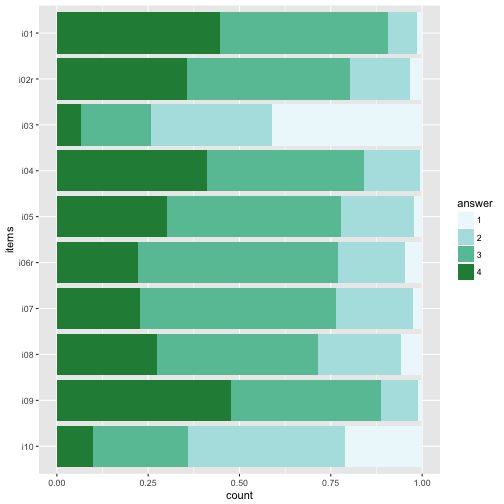
p2 + scale_fill_brewer(palette = "BuGn")
p2 + scale_fill_brewer(palette = 12)
Diverging palettes.
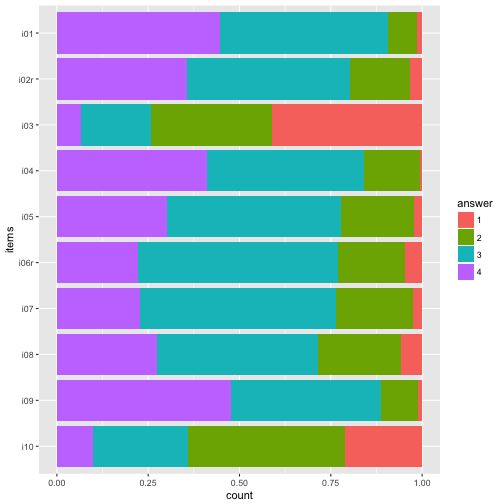
p2 + scale_fill_brewer(palette = "RdYlGn")
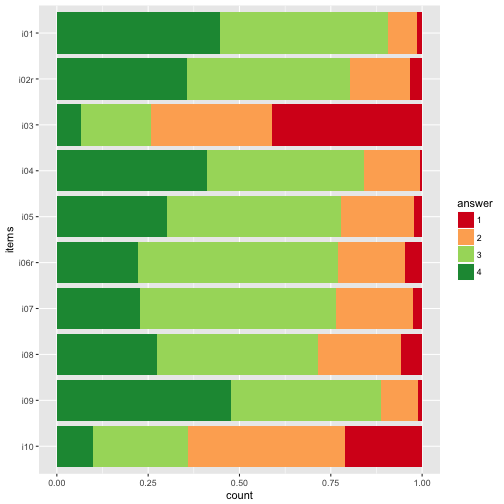
p2 + scale_fill_brewer(palette = "RdYlBu")
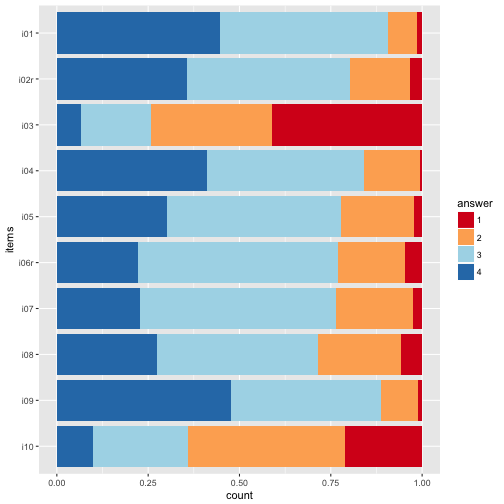
The divering palettes are useful because we have two “poles” - “do not agree” on one side, and “do agree” on the other side.
See here for an overview on Brewer palettes.
Or maybe just grey tones.
p2 + scale_fill_grey()
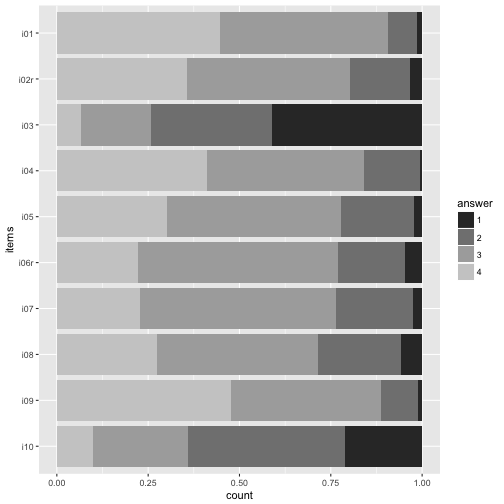
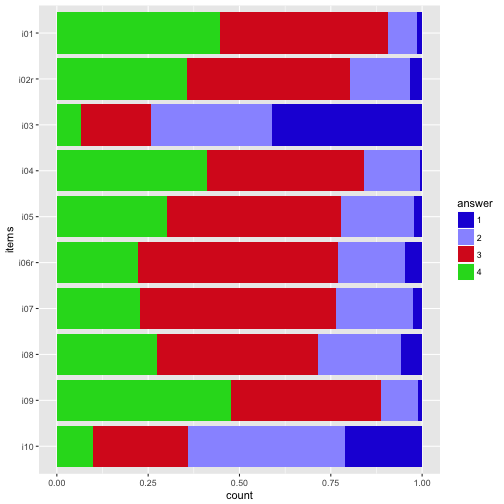
My own favorite-cherished color.
colours <- c("#2121D9", "#9999FF", "#D92121", "#21D921", "#FFFF4D", "#FF9326")
p2 + scale_fill_manual(values=colours)
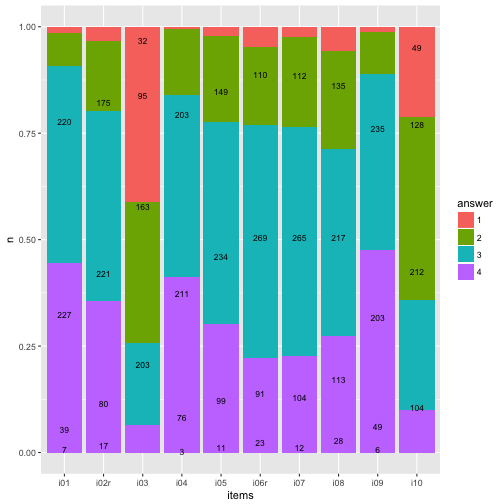
Numbers (count) on bars
It might be helpful to print the exact numbers on the bars.
data2 %>%
  dplyr::count(items, answer) %>%
  mutate(y_pos = cumsum(n)/nrow(data_items) - (0.5 * n/nrow(data_items)),
         y_cumsum = cumsum(n)) %>%
  mutate(items_num = parse_number(items)) -> data3

ggplot(data3, aes(x = items, y = n)) +
  geom_bar(aes(fill = answer), position = "fill", stat = "identity") +
  geom_text(aes(y = y_pos, label = n),  size = 3) -> p3

p3
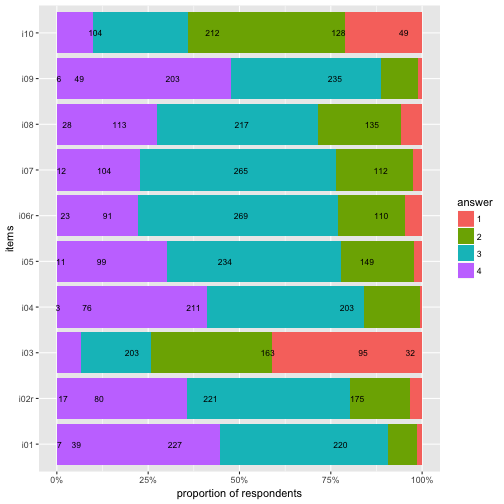
Flip coordinate system, and with “%” labels.
p3 + coord_flip() +
  scale_y_continuous(labels = scales::percent) +
  ylab("proportion of respondents") -> p4
p4
Highlight main category
data3 %>%
  mutate(answer = as.numeric(answer)) %>%
  group_by(items) %>%
  mutate(max_n = max(n)) %>%
  mutate(max_cat = factor(which(n == max_n))) %>%
  mutate(fit_cat = (answer == max_cat)) %>%
  ungroup -> data4


ggplot(data4, aes(x = items, y = n)) +
  geom_bar(aes(fill = factor(answer),
               color = fit_cat), position = "fill", stat = "identity") +
  geom_text(aes(y = y_pos, label = n),  size = 3) +
  scale_color_manual(values = c("NA", "red"), guide = "none") +
  scale_fill_grey()
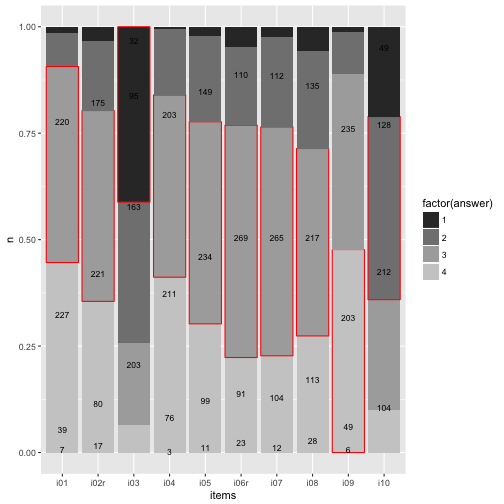
To be honest, does really look nice. Let’s try something different later.
Barplot with geom_rect
This section and code is inspired by this post.
The goal is to produce a more flexible bar plot, such as a “waterfall plot”, where y= 0 is centered at the middle bar height, we need to change the geom. No more geom_bar but the more versatile geom_rect. This geom plots, surprisingly, rectangles. Hence, we need to know the start and the end value (for the y-axis, the width of the bar is just 1).
First, we need to prepare the dataset for that task.
data4 %>%
  select(items, answer, y_cumsum) %>%
  group_by(items) %>%
  spread(key = answer, value = y_cumsum) %>%
  mutate(zero = 0, end = nrow(data_items)) %>%
  select(items, zero, `1`, `2`, `3`, `4`, end) %>%
  ungroup %>%
  mutate(items_num = 1:10) -> data5


data5 %>%
  rename(start_1 = zero) %>%
  mutate(end_1 = `1`) %>%
  mutate(start_2 = `1`) %>%
  mutate(end_2 = `2`) %>%
  mutate(start_3 = `2`) %>%
  mutate(end_3 = `3`) %>%
  mutate(start_4 = `3`) %>%
  mutate(end_4 = end) %>%
  select(items_num, start_1, end_1, start_2, end_2, start_3, end_3, start_4, end_4) -> data6

head(data6) %>% kable
| items_num | start_1 | end_1 | start_2 | end_2 | start_3 | end_3 | start_4 | end_4 |
|---|---|---|---|---|---|---|---|---|
| 1 | 0 | 7 | 7 | 46 | 46 | 273 | 273 | 493 |
| 2 | 0 | 17 | 17 | 97 | 97 | 318 | 318 | 493 |
| 3 | 0 | 203 | 203 | 366 | 366 | 461 | 461 | 493 |
| 4 | 0 | 3 | 3 | 79 | 79 | 290 | 290 | 493 |
| 5 | 0 | 11 | 11 | 110 | 110 | 344 | 344 | 493 |
| 6 | 0 | 23 | 23 | 114 | 114 | 383 | 383 | 493 |
OK, we have that, pooh, quite a mess.
So, now we need it in long form. Here come a not so elegant, but rather simple, solution for that.
data_cat1 <- select(data6, items_num, start_1, end_1) %>% setNames(c("items", "start", "end")) %>% mutate(answer = 1)
data_cat2 <- select(data6, items_num, start_2, end_2) %>% setNames(c("items","start", "end"))  %>% mutate(answer = 2)
data_cat3 <- select(data6, items_num, start_3, end_3) %>% setNames(c("items","start", "end"))  %>% mutate(answer = 3)
data_cat4 <- select(data6, items_num, start_4, end_4) %>% setNames(c("items","start", "end"))  %>% mutate(answer = 4)


data7 <- bind_rows(data_cat1, data_cat2, data_cat3, data_cat4)

data7 %>% head %>% kable
| items | start | end | answer |
|---|---|---|---|
| 1 | 0 | 7 | 1 |
| 2 | 0 | 17 | 1 |
| 3 | 0 | 203 | 1 |
| 4 | 0 | 3 | 1 |
| 5 | 0 | 11 | 1 |
| 6 | 0 | 23 | 1 |
Now let’s plot the bar graph with the rectangle plot.
data7$answer <- factor(data7$answer)

ggplot(data7) +
  aes() +
  geom_rect(aes(x = items,
                ymin = start,
                ymax = end,
                xmin = items - 0.4,
                xmax = items + 0.4,
                fill = answer)) +
  scale_x_continuous(breaks = 1:10, name = "items") +
  ylab("n") -> p5
## Warning: Ignoring unknown aesthetics: x
p5 + geom_text(data = data3, aes(x = items_num, y = y_pos*nrow(data), label = n), size = 2) -> p6

p6

Compare that to the geom_bar solution.
p3

Basically identical (never mind the bar width).
Now flip the coordinates again (and compare to previous solution with geom_bar).
p6 + coord_flip()
p4

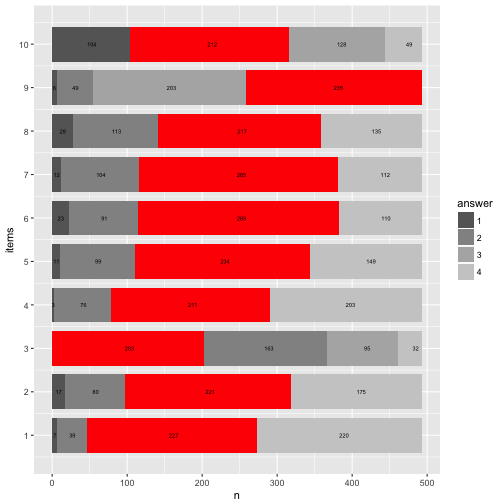
Let’s try to highlight the most frequent answer category for each item.
data7 %>%
  mutate(n = end - start) %>%
  group_by(items) %>%
  mutate(max_n = max(n)) %>%
  mutate(max_cat = factor(which(n == max_n))) %>%
  mutate(fit_cat = (answer == max_cat)) %>%
  ungroup -> data8

data8 %>%
  filter(fit_cat == TRUE) -> data8a


data7 %>%
  ggplot() +
  aes() +
  geom_rect(aes(x = items,
                ymin = start,
                ymax = end,
                xmin = items - 0.4,
                xmax = items + 0.4,
                fill = answer)) +
  scale_x_continuous(breaks = 1:10, name = "items") +
  ylab("n") +
  scale_fill_grey(start = .4, end = .8) -> p8
## Warning: Ignoring unknown aesthetics: x
p8 + geom_rect(data = data8a, aes(x = items,
                ymin = start,
                ymax = end,
                xmin = items - 0.4,
                xmax = items + 0.4), fill = "red")  +
  geom_text(data = data3, aes(x = items_num, y = y_pos*nrow(data), label = n), size = 2) -> p8
## Warning: Ignoring unknown aesthetics: x
p8 + coord_flip()
Here’s a cheat sheet on colors and palettes; and here you’ll find an overview on colors (with names and hex codes).
Mrs. Brewer site is a great place to come up with your own palette and learn more about colors.
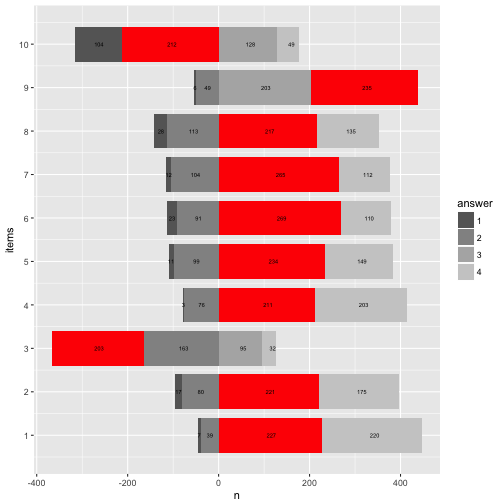
Rainbow diagram
Let’s try to “move” the bars to our wishes. Precisely, it would be nice if the bars were aligned at the “Rubicon” between “do not agree” and “do agree”. Then we could see better how many persons agree and not.
More practically, if we knew that 104+212 = 316 persons basically disagree, then 316 could be our “zero line” (item 10). Repeat that for each item.
data8 %>%
  group_by(items) %>%
  mutate(n_disagree = sum(n[c(1,2)]),
         n_agree = sum(n[c(3,4)]),
         start_adj = start - n_disagree,
         end_adj = end - n_disagree
         ) %>%
  ungroup -> data9


data9 %>%
  ggplot() +
  aes() +
  geom_rect(aes(x = items,
                ymin = start_adj,
                ymax = end_adj,
                xmin = items - 0.4,
                xmax = items + 0.4,
                fill = answer)) +
  scale_x_continuous(breaks = 1:10, name = "items") +
  ylab("n") +
  scale_fill_grey(start = .4, end = .8) -> p9
## Warning: Ignoring unknown aesthetics: x
p9
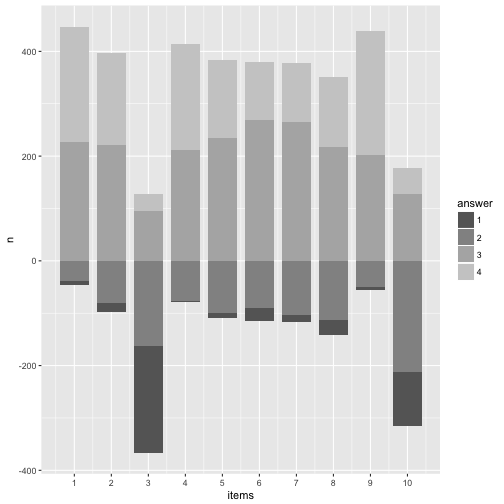
Looks quite cool.
Now let’s add the numbers to that plot.
data4 %>%
  mutate(items_num = parse_number(items)) %>%
  dplyr::select(-items) %>%
  rename(items = items_num) %>%
  select(items, everything()) %>%
  arrange(answer, items) %>%
  ungroup -> data10


data9 %>%
  mutate(y_pos_adj = data10$y_pos * nrow(data) - n_disagree) -> data11


p9 +
  geom_text(data = data11, aes(x = items, y = y_pos_adj, label = n), size = 2) -> p11

p11

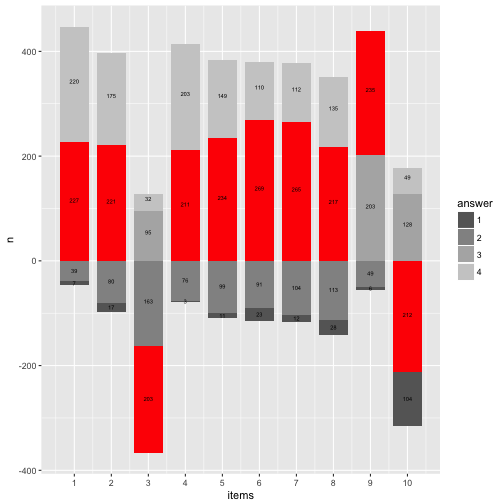
And now let’s highlight the most frequent answer category.
library(ggrepel)

data11 %>%
  ggplot() +
  aes() +
  geom_rect(aes(x = items,
                ymin = start_adj,
                ymax = end_adj,
                xmin = items - 0.4,
                xmax = items + 0.4,
                fill = answer)) +
  scale_fill_grey(start = .4, end = .8) +
  geom_rect(data = filter(data11, fit_cat == TRUE),
            aes(x = items,
                ymin = start_adj,
                ymax = end_adj,
                xmin = items - 0.4,
                xmax = items + 0.4),
            fill = "red") +
  geom_text(aes(x = items, y = y_pos_adj, label = n), size = 2) +
  scale_x_continuous(breaks = 1:10) +
  ylab("n") -> p12
## Warning: Ignoring unknown aesthetics: x

## Warning: Ignoring unknown aesthetics: x
p12
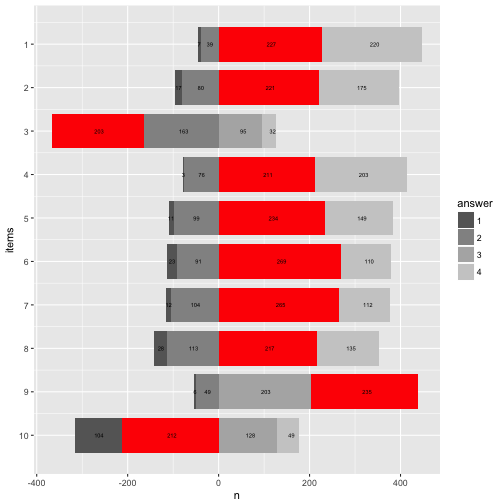
OK, that’s about it for today. May turn the waterfall by 90°.
p12 + coord_flip()
And change the direction of the now numeric items-axis.
p12 + coord_flip() + scale_x_reverse(breaks = 1:10)
## Scale for 'x' is already present. Adding another scale for 'x', which
## will replace the existing scale.
Happy plotting!
 Ok, passt in etwa.