Bei der Textanalyse (Textmining) ist die Sentiment-Analyse eine typische Tätigkeit. Natürlich steht und fällt die Qualität der Sentiment-Analyse mit der Qualität des verwendeten Wörterbuchs (was nicht heißt, dass man nicht auch auf andere Klippen schellen kann).

Der Zweck dieses Posts ist es, eine Sentiment-Lexikon in deutscher Sprache einzulesen.

Dazu wird das Sentiment-Lexikon dieser Quelle verwendet (CC-BY-NC-SA 3.0). In diesem Paper finden sich Hintergründe. Von dort lassen sich die Daten herunter laden. Im folgenden gehe ich davon aus, dass die Daten herunter geladen sind und sich im Working Directory befinden.

Wir benötigen diese Pakete (es ginge auch über base):

library(stringr)
library(readr)
library(dplyr)

Dann lesen wir die Daten ein, zuerst die Datei mit den negativen Konnotationen:

neg_df <- read_tsv("SentiWS_v1.8c_Negative.txt", col_names = FALSE)
names(neg_df) <- c("Wort_POS", "Wert", "Inflektionen")

glimpse(neg_df)
#> Observations: 1,818
#> Variables: 3
#> $ Wort_POS     <chr> "Abbau|NN", "Abbruch|NN", "Abdankung|NN", "Abdämp...
#> $ Wert         <dbl> -0.0580, -0.0048, -0.0048, -0.0048, -0.0048, -0.3...
#> $ Inflektionen <chr> "Abbaus,Abbaues,Abbauen,Abbaue", "Abbruches,Abbrü...

Dann parsen wir aus der ersten Spalte (Wort_POS) zum einen den entsprechenden Begriff (z.B. “Abbau”) und zum anderen die Wortarten-Tags (eine Erläuterung zu den Wortarten-Tags findet sich hier).

neg_df %>% 
  mutate(Wort = str_sub(Wort_POS, 1, regexpr("\\|", .$Wort_POS)-1),
         POS = str_sub(Wort_POS, start = regexpr("\\|", .$Wort_POS)+1)) -> neg_df

str_sub parst zuerst das Wort. Dazu nehmen wir den Wort-Vektor Wort_POS, und für jedes Element wird der Text von Position 1 bis vor dem Zeichen | geparst; da der Querstrich ein Steuerzeichen in Regex muss er escaped werden. Für POS passiert das gleiche von Position |+1 bis zum Ende des Text-Elements.

Das gleiche wiederholen wir für positiv konnotierte Wörter.

pos_df <- read_tsv("SentiWS_v1.8c_Positive.txt", col_names = FALSE)
names(pos_df) <- c("Wort_POS", "Wert", "Inflektionen")
pos_df %>% 
  mutate(Wort = str_sub(Wort_POS, 1, regexpr("\\|", .$Wort_POS)-1),
         POS = str_sub(Wort_POS, start = regexpr("\\|", .$Wort_POS)+1)) -> pos_df

Schließlich schweißen wir beide Dataframes in einen:

bind_rows("neg" = neg_df, "pos" = pos_df, .id = "neg_pos") -> sentiment_df
sentiment_df %>% select(neg_pos, Wort, Wert, Inflektionen, -Wort_POS) -> sentiment_df
knitr::kable(head(sentiment_df))
neg_pos Wort Wert Inflektionen
neg Abbau -0.058 Abbaus,Abbaues,Abbauen,Abbaue
neg Abbruch -0.005 Abbruches,Abbrüche,Abbruchs,Abbrüchen
neg Abdankung -0.005 Abdankungen
neg Abdämpfung -0.005 Abdämpfungen
neg Abfall -0.005 Abfalles,Abfälle,Abfalls,Abfällen
neg Abfuhr -0.337 Abfuhren

Literatur

R. Remus, U. Quasthoff & G. Heyer: SentiWS - a Publicly Available German-language Resource for Sentiment Analysis. In: Proceedings of the 7th International Language Ressources and Evaluation (LREC’10), 2010

This posts shows data cleaning and preparation for a data set on a statistics test (NHST inference). Data is published under a CC-licence, see here.

Data was collected 2015 to 2017 in statistics courses at the FOM university in different places in Germany. Several colleagues helped to collect the data. Thanks a lot! Now let’s enjoy the outcome (and make it freely available to all).

Raw N is 743. The test consists of 40 items which are framed as propositions; students are asked to respond with either “true” or “false” to each item. In addition, self-rating of proportion correct, study time and interest in the subject are asked. Last column notes the number (proportion) of correct responses.

Raw data can be accessed here

df_raw <- read.csv("https://sebastiansauer.github.io/data/test_inf_raw.csv")

Alternatively, use this link: https://osf.io/zcvkd.

DOI of this data is: DOI 10.17605/OSF.IO/SJHUY, URL: https://osf.io/sjhuy

Some packages:

library(tidyverse)

To make the data set less clumsy, let’s replace variable names.

test_inf_names <- names(df_raw)
df <- df_raw
names(df) <- paste("V", 1:ncol(df_raw), sep = "_")

df <- rename(df, study_time = V_43, self_eval = V_44, interest = V_45)

The vector test_inf_names can now serve as a codebook; the variable names are stored there.

The correct answers for the 40 questions are:

correct <- c(
  T, T, T, T, F, 
  F, F, F, F, T, 
  T, T, F, T, T,
  T, T, T, T, F, 
  F, T, T, F, T,
  F, F, F, T, F, 
  T, T, F, T, T,
  F, T, T, T, F 
)

We can now compare the actual answers to the correct ones for each respondent. Let’s leave that for later :-) What’s more, the items (questions) have changed over time. Malheuresement, the software used for delivering the survey (Google forms) does not save the history (and I did not really either, I admit). So I am not 100% sure whether the “solution vector” above is correct for each and every (older) respondent.

Instead, in the first step, let’s focus on the data where the solution is already provided for brevity. This information is stored in V_46 (Punkte). Let’s convert that string to a number.

library(readr) 
library(stringr)
df$score <- str_sub(df$V_46, start = 1, end = 2)
df$score <- as.numeric(df$score)

Out of curiosity, let’s look at the distribution of the score.

ggplot(df, aes(x = score)) +
  geom_histogram()
#> `stat_bin()` using `bins = 30`. Pick better value with `binwidth`.
#> Warning: Removed 443 rows containing non-finite values (stat_bin).

plot of chunk unnamed-chunk-6

Note that the NAs are not shown. If a given student didn’t know anything, but would flip a coin for each answer, what’s the probability of getting x correct answers? In other words, in a sequence of 40 coin flips, what’s the probability of getting at least x right?

x <- 0:40
cdf <- pbinom(x, 40, prob = .5)

temp <- tibble(x, cdf)

ggplot() +
  geom_rect(aes(xmin = 15, xmax = 25, ymin = 0, ymax = 1), fill = "red", alpha = .3) +
  geom_line(data = temp, aes(x = x, y = cdf) )
  

plot of chunk unnamed-chunk-7

The diagram shows the probability of getting not more than x right. From a crude glance, say, 15 to 25 corrects answers are quite compatible with chance (coin tossing).

Let’s extract these and see how many cases are left.

df %>% filter(!is.na(score)) %>% nrow
#> [1] 321
df %>% filter(score > 16) %>% nrow
#> [1] 306

As the initial score variable was Punkte, let’s see how many NAs we had there.

df %>% filter(!is.na(V_46)) %>% nrow
#> [1] 764

OK, let’s assume all responses > 15 are “real” trials, not just guessing and clicking.

df <- filter(df, score > 15)

Association of study time and score

Now, what’s bothering me since years is whether (and how strong) there is an association between score and study time. Now finally, let’s jete a coup d’oeil.


r1 <- round(cor(df$study_time, df$score, use = "complete.obs"), 2)

p1 <- ggplot(df) +
  aes(x = study_time, y = score) +
  geom_jitter() + geom_smooth() +
  annotate(label = paste("r = ", r1), geom = "label", x = 4, y = 20, hjust = 0)

p1
#> `geom_smooth()` using method = 'loess' and formula 'y ~ x'
#> Warning: Removed 68 rows containing non-finite values (stat_smooth).
#> Warning in simpleLoess(y, x, w, span, degree = degree, parametric =
#> parametric, : pseudoinverse used at 3
#> Warning in simpleLoess(y, x, w, span, degree = degree, parametric =
#> parametric, : neighborhood radius 1
#> Warning in simpleLoess(y, x, w, span, degree = degree, parametric =
#> parametric, : reciprocal condition number 0
#> Warning in predLoess(object$y, object$x, newx = if
#> (is.null(newdata)) object$x else if (is.data.frame(newdata))
#> as.matrix(model.frame(delete.response(terms(object)), : pseudoinverse used
#> at 3
#> Warning in predLoess(object$y, object$x, newx = if
#> (is.null(newdata)) object$x else if (is.data.frame(newdata))
#> as.matrix(model.frame(delete.response(terms(object)), : neighborhood radius
#> 1
#> Warning in predLoess(object$y, object$x, newx = if
#> (is.null(newdata)) object$x else if (is.data.frame(newdata))
#> as.matrix(model.frame(delete.response(terms(object)), : reciprocal
#> condition number 0
#> Warning: Removed 68 rows containing missing values (geom_point).

library(ggExtra)
#ggMarginal(p1)

plot of chunk unnamed-chunk-11

And the correlation is 0.441; hey, that’s quite strong!

Let’s also check ordinal correlation:

cor(df$study_time, df$score, method = "spearman", use = "complete.obs")
#> [1] 0.452
cor(df$study_time, df$score, method = "kendall", use = "complete.obs")
#> [1] 0.349

Given some measurement error, it can be speculated that the real, unattenuated correlation is quite substantial indeed.

Maybe have a lookt at boxplots, as study time is not really metric:

ggplot(df) +
  aes(x = factor(study_time), y = score) +
  geom_boxplot()

plot of chunk unnamed-chunk-13

Assocation of interest and score

Similarly, if one is interested in the subject, does she scores higher?

r2 <- round(cor(df$interest, df$score, use = "complete.obs"), 2)

p2 <- ggplot(df) +
  aes(x = interest, y = score) +
  geom_jitter() + geom_smooth() +
  annotate(label = paste("r = ", r2), geom = "label", x = 4, y = 20, hjust = 0)
p2
#> `geom_smooth()` using method = 'loess' and formula 'y ~ x'
#> Warning: Removed 68 rows containing non-finite values (stat_smooth).
#> Warning: Removed 68 rows containing missing values (geom_point).

#ggMarginal(p2)

plot of chunk unnamed-chunk-14

Weaker, but detectable.

Association of self-evaluation and score

Well, if I think I will score poorly (superb), will I do so? Does my self-image match the actual outcome?

r3 <- round(cor(df$self_eval, df$score, use = "complete.obs"), 2)

p3 <- ggplot(df) +
  aes(x = self_eval, y = score) +
  geom_jitter() + geom_smooth() +
  annotate(label = paste("r = ", r3), geom = "label", x = 8, y = 20, hjust = 0)
p3
#> `geom_smooth()` using method = 'loess' and formula 'y ~ x'
#> Warning: Removed 68 rows containing non-finite values (stat_smooth).
#> Warning: Removed 68 rows containing missing values (geom_point).

#ggMarginal(p3)

plot of chunk unnamed-chunk-15

Oh, that’s strong; folks know when they’ll nail it. Good.

Correlation matrix

Finally, let’s look at the correlation matrix of the variables mentioned above.

library(corrr)

df %>%
  select(score, study_time, interest, self_eval) %>% 
  correlate %>% 
  shave   -> r_mat

r_mat
#> # A tibble: 4 × 5
#>      rowname score study_time interest self_eval
#>        <chr> <dbl>      <dbl>    <dbl>     <dbl>
#> 1      score    NA         NA       NA        NA
#> 2 study_time 0.441         NA       NA        NA
#> 3   interest 0.223      0.461       NA        NA
#> 4  self_eval 0.628      0.559     0.36        NA

corrr::rplot(r_mat)

plot of chunk unnamed-chunk-16

A scatter plot matrix can be of interest, too.

library(GGally)


df %>%
  select(score, study_time, interest, self_eval) %>% 
  ggpairs( 
    lower = list(
    continuous = "smooth",
    combo = "facetdensity"
  ))
#> Warning in (function (data, mapping, alignPercent = 0.6, method =
#> "pearson", : Removed 68 rows containing missing values
#> Warning in (function (data, mapping, alignPercent = 0.6, method =
#> "pearson", : Removed 68 rows containing missing values
#> Warning in (function (data, mapping, alignPercent = 0.6, method =
#> "pearson", : Removed 68 rows containing missing values
#> Warning: Removed 68 rows containing non-finite values (stat_smooth).
#> Warning: Removed 68 rows containing missing values (geom_point).
#> Warning: Removed 68 rows containing non-finite values (stat_density).
#> Warning in (function (data, mapping, alignPercent = 0.6, method =
#> "pearson", : Removed 68 rows containing missing values
#> Warning in (function (data, mapping, alignPercent = 0.6, method =
#> "pearson", : Removed 68 rows containing missing values
#> Warning: Removed 68 rows containing non-finite values (stat_smooth).
#> Warning: Removed 68 rows containing missing values (geom_point).
#> Warning: Removed 68 rows containing non-finite values (stat_smooth).
#> Warning: Removed 68 rows containing missing values (geom_point).
#> Warning: Removed 68 rows containing non-finite values (stat_density).
#> Warning in (function (data, mapping, alignPercent = 0.6, method =
#> "pearson", : Removed 68 rows containing missing values
#> Warning: Removed 68 rows containing non-finite values (stat_smooth).
#> Warning: Removed 68 rows containing missing values (geom_point).
#> Warning: Removed 68 rows containing non-finite values (stat_smooth).
#> Warning: Removed 68 rows containing missing values (geom_point).
#> Warning: Removed 68 rows containing non-finite values (stat_smooth).
#> Warning: Removed 68 rows containing missing values (geom_point).
#> Warning: Removed 68 rows containing non-finite values (stat_density).

plot of chunk unnamed-chunk-17

Debrief

As a teacher, I feel reassured that study time is associated with test performance.

Processed data can also be downloaded, here.

Logistic regression may give a headache initially. While the structure and idea is the same as “normal” regression, the interpretation of the b’s (ie., the regression coefficients) can be more challenging.

This post provides a convenience function for converting the output of the glm function to a probability. Or more generally, to convert logits (that’s what spit out by glm) to a probabilty.

Note1: The objective of this post is to explain the mechanics of logits. There are more convenient tools out there. (Thanks to Jack’s comment who made me adding this note.)

Note2: I have corrected an error pointed out by Jana’s comment, below (you can always check older versions on the Github repo).

Example time

So, let’s look at an example. First load some data (package need be installed!):

data(titanic_train, package = "titanic")
d <- titanic_train  # less typing

Compute a simple glm:

glm1 <- glm(Survived ~ Pclass, data = d, family = "binomial")

The coeffients are the interesting thing:

coef(glm1)
## (Intercept)      Pclass 
##   1.4467895  -0.8501067

These coefficients are in a form called ‘logits’.

Takeaway

If coefficient (logit) is positive, the effect of this predictor (on survival rate) is positive and vice versa.

Here Pclass coefficient is negative indicating that the higher Pclass the lower is the probability of survival.

Conversion rule

To convert a logit (glm output) to probability, follow these 3 steps:

  • Take glm output coefficient (logit)
  • compute e-function on the logit using exp() “de-logarithimize” (you’ll get odds then)
  • convert odds to probability using this formula prob = odds / (1 + odds). For example, say odds = 2/1, then probability is 2 / (1+2)= 2 / 3 (~.67)

R function to rule ‘em all (ahem, to convert logits to probability)

This function converts logits to probability.

logit2prob <- function(logit){
  odds <- exp(logit)
  prob <- odds / (1 + odds)
  return(prob)
}

For convenience, you can source the function like this:

source("https://sebastiansauer.github.io/Rcode/logit2prob.R")

For our glm:

logit2prob(coef(glm1))
## (Intercept)      Pclass 
##   0.8095038   0.2994105

How to convert logits to probability

How to interpret:

  • The survival probability is 0.8095038 if Pclass were zero (intercept).
  • However, you cannot just add the probability of, say Pclass == 1 to survival probability of PClass == 0 to get the survival chance of 1st class passengers.

Instead, consider that the logistic regression can be interpreted as a normal regression as long as you use logits. So the general regression formula applies as always:

y = intercept + b*x

That is, in our example

logits_survival = intercept + b_survival*Pclass

where b_survival is given in logits (it’s just the b-coefficient of Pclass).

So, it’ simple to calculate by hand, eg., the survival logits for a 2nd class passenger:

(intercept <- coef(glm1)[1])
## (Intercept) 
##     1.44679
(b_survival <- coef(glm1)[2])
##     Pclass 
## -0.8501067
(logits_survival <- intercept + 2 * b_survival)
## (Intercept) 
##   -0.253424

Thus, the logits of survival are -0.25 Now we can convert to probability:

logit2prob(logits_survival)
## (Intercept) 
##   0.4369809

Lumping logits to probability

Remember that \(e^1 \approx 2.71\). That is, if your logit is 1, your odds will be approx. 2.7 to 1, so the the probability is 2.7 / 3.7, or about 3/4, 75%.

Similarly important, \(e^0 = 1\). Hence, your odds will be 1:1, ie., 50%.

Hence, whenever your logit is negative, the associated probability is below 50% and v.v. (positive logit <–> probability above 50%).

Predict as convenience function

However, more convenient would be to use the predict function instance of glm; this post is aimed at explaining the idea. In practice, rather use:

predict(glm1, data.frame(Pclass = 1), type = "response")
##        1 
## 0.644897

In the 1st class, survival chance is ~65%, and for 2nd class about 44%.

predict(glm1, data.frame(Pclass = 2), type = "response")
##         1 
## 0.4369809

Conversion table

Here’s a look up table for the conversion:

logit_seq <- seq(-10, 10, by = 2)
prob_seq <- round(logit2prob(logit_seq), 3)

df <- data.frame(Logit = logit_seq,
                 Probability = prob_seq)
library(htmlTable)
htmlTable(df)
Logit Probability
1 -10 0
2 -8 0
3 -6 0.002
4 -4 0.018
5 -2 0.119
6 0 0.5
7 2 0.881
8 4 0.982
9 6 0.998
10 8 1
11 10 1

A handy function is datatable, does not work in this environment however it appears.

library(DT)
datatable(df)

plot of chunk unnamed-chunk-14

The package mfx provides a convenient functions to get odds out of a logistic regression (Thanks for Henry Cann’s comment for pointing that out!).

Conversion plot

More convenient for an overview is a plot like this.

library(ggplot2)


logit_seq <- seq(-10, 10, by = .1)

prob_seq <- logit2prob(logit_seq)

rm(df)

df <- data.frame(Logit = logit_seq,
                 Probability = prob_seq)

ggplot(df) +
  aes(x = logit_seq, y = prob_seq) +
  geom_point(size = 2, alpha = .3) +
  labs(x = "logit", y = "probability of success")

plot of chunk unnamed-chunk-15

Takeway

The relationship between logit and probability is not linear, but of s-curve type.

The coefficients in logit form can be be treated as in normal regression in terms of computing the y-value.

Transform the logit of your y-value to probability to get a sense of the probability of the modeled event.

Happy glming!

sessionInfo

sessionInfo()
## R version 3.3.2 (2016-10-31)
## Platform: x86_64-apple-darwin13.4.0 (64-bit)
## Running under: macOS Sierra 10.12.4
## 
## locale:
## [1] en_US.UTF-8/en_US.UTF-8/en_US.UTF-8/C/en_US.UTF-8/en_US.UTF-8
## 
## attached base packages:
## [1] stats     graphics  grDevices utils     datasets  methods   base     
## 
## other attached packages:
## [1] ggplot2_2.2.1 DT_0.2        htmlTable_1.9
## 
## loaded via a namespace (and not attached):
##  [1] Rcpp_0.12.10        knitr_1.16          magrittr_1.5       
##  [4] munsell_0.4.3       colorspace_1.3-2    R6_2.2.1           
##  [7] rlang_0.1           plyr_1.8.4          stringr_1.2.0      
## [10] highr_0.6           dplyr_0.5.0         tools_3.3.2        
## [13] grid_3.3.2          webshot_0.4.0       gtable_0.2.0       
## [16] checkmate_1.8.2     DBI_0.6-1           htmltools_0.3.6    
## [19] yaml_2.1.14         lazyeval_0.2.0.9000 assertthat_0.2.0   
## [22] rprojroot_1.2       digest_0.6.12       tibble_1.3.0.9002  
## [25] htmlwidgets_0.8     rsconnect_0.8       evaluate_0.10      
## [28] rmarkdown_1.5       labeling_0.3        stringi_1.1.5      
## [31] scales_0.4.1        backports_1.0.5     jsonlite_1.4

Bar plots, whereas not appropriate for means, are helpful for conveying impressions of frequencies, particularly relative frequencies, ie., proportions.

Intuition: Bar plots and histograms alike can be thought of as piles of Lego pieces, put onto each each other, where each Lego piece represents (is) one observation.

Presenting tables of frequencies are often not insightful to the eye. Bar plots are often much more accessible and present the story more clearly.

In R, using ggplot2, there are basically two ways of plotting bar plots (as far as I know). First, we can just take a data frame in its raw form and let ggplot2 count the rows so to compute frequencies and map that to the height of the bar. Second, we can do the computation of frequencies ourselves and just give the condensed numbers to ggplot2. Let’s look at each of the two ways in turn.

Way one: Give raw, unprocessed data to ggplot

First, let’s give the raw (unprocessed) data frame to ggplot2, and let ggplot2 compute frequencies. For example:

data(Affairs, package = "AER") # package must be installed upfron

library(ggplot2)
library(dplyr)


ggplot(Affairs) +
  aes(x = rating, fill = factor(affairs)) +
  geom_bar(position = "fill")

plot of chunk unnamed-chunk-1

# Recode: 0 -> "Iron Heart"; else -> "Player"
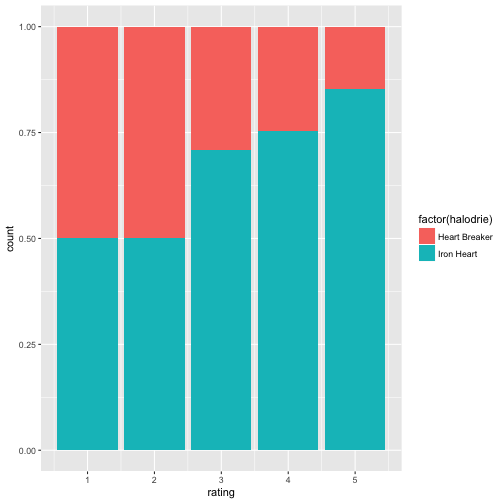
Affairs$halodrie <- recode(Affairs$affairs, `0` = "Iron Heart", .default = "Heart Breaker")


ggplot(Affairs) +
  aes(x = rating, fill = factor(halodrie)) +
  geom_bar(position = "fill")

plot of chunk unnamed-chunk-1

Data comes from Fair (1978): Fair, R.C. (1978). A Theory of Extramarital Affairs. Journal of Political Economy, 86, 45–61.

Some notes. We use fill = ... to say “put the number of ‘Heart Breakers’ and ‘Iron Hearts’ onto each other”. So the columns for ‘Heart breakers’ and for ‘Iron Hearts’ pile up on each other. Of importance, the position = "fill" (note the quotation marks) will make “proportion bars”, so the height of the bar goes up to 100%. This is obviously only of use if different colors indicate the relative height (frequencies) of the categories in the bar. Don’t forget to make the filling variable of type factor, otherwise the filling can go awry.

Also note that you cannot make use of qplot here, as qplot does not support the position parameter (see documentation; qplot is designed for easy, quick plotting):

qplot(data = Affairs,
      x = rating, fill = halodrie, geom = "bar", position = "fill")
## Warning: `position` is deprecated

plot of chunk unnamed-chunk-2

Way two: Summarise the frequencies upfront, and give the summaries to ggplot

Way two basically consists of doing the computation of the frequencies by oneself and of then giving the frequencies per category/group for plotting. See:

A2 <- count(Affairs, rating, halodrie)
A2 <- group_by(A2, rating)
A2 <- mutate(A2, prop = n / sum(n))

Now we handover A2, the dataframe consisting of summarized data (frequencies) to qplot:

qplot(x = rating, y = prop, fill = halodrie, data = A2, geom = "col")

plot of chunk unnamed-chunk-4

Easy, right? Note that geom col (as in column) expects single numbers; it does not count rows (as does geom_bar). In effect, geom_col(...) is geom_bar(stat = identity, ...). As our proportions sum up to 100% we do need need to care to tell about relative height plotting. Works out automatically.

To the contrary, geom_bar won’t work:

qplot(x = rating, fill = halodrie, data = A2, geom = "bar")

plot of chunk unnamed-chunk-5

Translating qplot to ggplot is easy enough:

ggplot(A2) +
  aes(x = rating, y = prop, fill = halodrie) +
  geom_col()

plot of chunk unnamed-chunk-6

Some polishment:

qplot(x = rating, y = prop, fill = halodrie, geom = "col", data = A2) + theme(legend.position = "bottom") + labs(title = "Halodrie-status \nacross different levels of marital satisfaction") +
  theme(plot.title = element_text(hjust = 0.5))

plot of chunk unnamed-chunk-7

Now suppose, we want not showing the proportions, ie., the bars should not have height 100%, but the real count-height. position = "stack" will accomplish that.

ggplot(A2) +
  geom_col(aes(x = rating, y = n, fill = halodrie), position = "stack")

plot of chunk unnamed-chunk-8

Note that this view makes it more difficult to tell in which column the proportion of “Heart Players” is high(er).

In qplot:

qplot(data = A2,
      x = rating,
      y = n,
      fill = halodrie,
      geom = "col")

plot of chunk unnamed-chunk-9

Happy plotting!

It comes as no surprise that \(R^2\) (“coefficient of determination”) equals \(r^2\) in simple regression (predictor X, criterion Y), where \(r(X,Y)\) is Pearson’s correlation coefficient. \(R^2\) equals the fraction of explained variance in a simple regression. However, the statistical (mathematical) background is often less clear or buried in less-intuitive formula.

The goal of this post is to offer a gentle explanantion why

\(R^2 = r^2\),

where \(r\) is \(r(Y,\hat{Y})\) and \(\hat{Y}\) are the predicted values.

Some more notation: \(Y_i\) are the individual values of the criterion, and \(\bar{Y}\) is the mean of the criterion.

As an example, suppose we wanted to predict the grades (\(Y\)) of some students based on their studying time (\(X\)). Of course, our prediction won’t be perfect most of the time, so there will be gaps (errors or residuals) between what we predict and what the actual grade in some particular \(Y_i\) case will be. So

\(Y_i - \hat{Y_i} \ne 0\), or, similarly \((Y_i - \hat{Y_i})^2 > 0\).

Let’s start with the idea that the variance is additive, see here or here for details. The additivity of variance implies that the whole variation in the students’ grades is the sum of the variance of our prediction errors and the improvement of our prediction/ regression model:

\(\sum_i{(Y_i - \hat{Y})}^2 = \sum_i{(Y_i - \hat{Y_i})}^2 + \sum_i{(\hat{Y_i} - \bar{Y})}^2\).

In words:

Total = Error^2 + Improvement^2.

Or:

Total variance in simple regression equals error variance plus variance explained by model.

This expression can be rearranged to

1 = Error^2 / Total + Improvement^2 / Total.

As formula:

\(1 = \frac{\sum_i{(Y_i - \hat{Y_i})}^2}{\sum_i{(Y_i - \bar{Y})}^2} + \frac{\sum_i{(\hat{Y_i} - \bar{Y})}^2}{\sum_i{(Y_i - \bar{Y})}^2}\).

Puh, quite some stuff. Now we apply a property of least square regression stating that there is no correlation between the residuals (e) and the predicted value (we don’t discuss that property here further). More formally:

\(r \{ (Y_i - \hat{Y_i}, \hat{Y}) \} = 0\).

A bit more readable:

\(r(e, \hat{Y}) = 0\).

Now we write the (sample) correlation between actual (observed) and predicted (fitted) values as follows:

\[r(Y, \hat{Y}) = \frac{n^{-1} \sum_i({Y_i - \bar{Y}) \cdot (\hat{Y_i} - \bar{Y})}}{\sqrt{n^{-1} \sum_i{(Y_i - \bar{Y})^2} \cdot n^{-1} \sum_i{(\hat{Y_i} - \bar{Y})^2}}}\]

In other words,

\[r(Y, \hat{Y}) = \frac{Cov(Y, \hat{Y})} {\sqrt{Var(Y) \cdot Var(\hat{Y})}}\]

Note that \(n^{-1}\) cancel out, leaving

\[r(Y, \hat{Y}) = \frac{\sum_i({Y_i - \bar{Y}) \cdot (\hat{Y_i} - \bar{Y})}}{\sqrt{ \sum_i{(Y_i - \bar{Y})^2} \cdot \sum_i{(\hat{Y_i} - \bar{Y})^2}}}\]

The variance can be seen as the average of the squared sums (SS) of some delta (d): \(Var(X) = n^{-1}\sum{d}\). If we on our way “lose” the \(n^{-1}\) part (as it happened in the line above), we are left with the sum of squares (SS), as they are called. Now, as we are concerned with the variance of the error, variance of the model improvement and the total variance, we can in the same way speak of the according SS-terms. We will come back to the SS-terms later on.

Now a little trick. We add the term \(-\hat{Y_i} + \hat{Y_i}\), which is zero, so no harm caused. We get:

\[r(Y, \hat{Y}) = \frac{\sum_i({Y_i - \hat{Y_i}) + (\hat{Y_i} - \bar{Y})) \cdot (\hat{Y_i} - \bar{Y})}}{\sqrt{ \sum_i{(Y_i - \bar{Y})^2} \cdot \sum_i{(\hat{Y_i} - \bar{Y})^2}}}\]

Now stay close. Observe that we have three terms in the numerator, let’s call them \(a\), \(b\), and \(c\). We can multiplicate that out resulting in \((a+b)c = ac + bc\). So:

\[= \frac{\sum{(Y_i - \hat{Y_i})(\hat{Y_i} - \bar{Y}) + (\hat{Y_i} - \bar{Y})(\hat{Y_i} - \bar{Y})}}{D}\]

As the denominator did not change, we just abbreviated it in the obvious way. Note that the numerator now is of the form \(ac + cc\) (as b = c). Thus we can further simplify to

\[= \frac{\sum{\{ (Y_i - \hat{Y_i})(\hat{Y_i} - \bar{Y}) + (\hat{Y_i} + \bar{Y})^2 \}}}{D}\]

Referring back to our notion of the two parts of the total variance in regression we can think of the numerator above as \(\sum{(e \cdot m + m^2)}\), where e indicates the error or residual term, and m the model improvement. However, as the correlation between m and e (which is zero, see above) is nothing but average product of m and e, their sum also is zero. Thus we are left with

\[= \frac{\sum_i{(\hat{Y_i} - \bar{Y})^2}}{\sqrt{ \sum_i{(Y_i - \bar{Y})^2} \cdot \sum_i{(\hat{Y_i} - \bar{Y})^2}}}\]

Think of the numerator as a and then \(a = \sqrt{a^2}\), thus

\[= \sqrt{ \frac{\sum_i{(\hat{Y_i} - \bar{Y})^2 \cdot \sum_i(\hat{Y_i} - \bar{Y})^2}}{ \sum_i{(Y_i - \bar{Y})^2} \cdot \sum_i{(\hat{Y_i} - \bar{Y})^2}}}\]

After canceling out the obvious we are left with

\[= \sqrt{ \frac{\sum_i{(\hat{Y_i} - \bar{Y})^2}}{ \sum_i{(Y_i - \bar{Y})^2}}}\]

This term is nothing but

Model variance / Total variance.

And we are there! To summarise

\[r(Y, \hat{Y})^2 = \frac{SS_M}{SS_T} = R^2\]

OK, quite some ride. At least we arrived where we headed to. Some algebra kungfu turned out to be handy. It took me some time to decypher the algebra without any explanation. So I hope me comments make the voyage a bit shorter for you.

Without some expertise in algebra (multiplicating out, adding zero-terms, …) and some knowledge of regression properties we would not have arrived at the end. The good news are that each of the steps is not really difficult to understand (I am not saying it is easy to discover these steps).